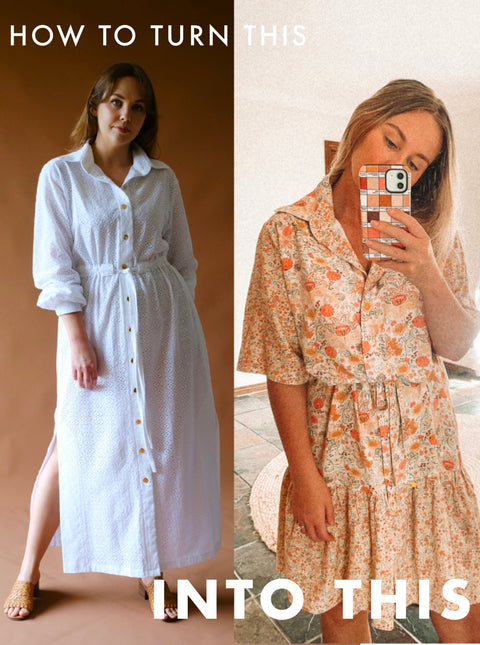
How to hack the Ritual Pattern into a summer style

About this pattern hack
We have included the fabrics required, fabric layout alongside the cutting & sewing steps to complete this hack. This will take all the annoying work such as calculating out of this pattern hack!
New features created in this tutorial:
-
Back section/gathered detail
The box pleat of the original Ritual pattern is switched to a softer looking gathered back section sewn to the yoke. The original pattern pieces are used for this, we simply add new marks to create the new back version. -
Ruffle section
The skirt ruffle is attached to the lower edge of the shirt section. The ruffle skirt sections are cut simply from two oblong shapes approximately 1 ½ of the width of the shirt section. -
Front Bands
Mark a new length on the front bands to match the Ritual summer dress hack. -
Sleeves
Short sleeves are created by cutting the original long sleeve pattern at the elbow line. -
Belt loops
Switch the waist casing for a simple tie and belt loops. We have included instructions to cut & sew two belt loops into the side seams. The original waist tie section can be used to create your new tie. -
Construction order
The order of the sewing steps will change slightly from the original Ritual pattern. We will guide you through the steps of how sew the Ritual summer hack version using this tutorial and the original sewing instructions for the sections that are unaltered
IF YOU'RE LOOKING FOR THE ORIGINAL RITUAL PATTERN, CLICK HERE
Fabric Required:
| Size | Fabric width 115cm /45 inches | Fabric width 140cm / 55 inches |
| Size XS | 3mtrs / 3 ½ yards | 2.4mtrs / 2 ¾ yards |
| Size Small | 3mtrs / 3 ½ yards | 2.4mtrs/ 2 ¾ yards |
| Size Medium | 3mtrs / 3 ½ yards | 2.4mtrs/ 2 ¾ yards |
| Size Large | 3mtrs / 3 ½ yards | 2.5mtrs /2 ¾ yards |
| Size 1X | 4mtrs / 4 ½ yards | 2.5mtrs/2 ¾ yards |
| Size 2X | 4mtrs / 4 ½ yards | 3mtrs/3 ½ yards |
| Size 3X | 4mtrs / 4 ½ yards | 3mtrs/3 ½ yards |
| Size 4X | 4mtrs / 4 ½ yards | 3mtrs/3 ½ yards |
| Size 5X | 4mtrs / 4 ½ yards | 3mtrs/3 ½ yards |
| Size 6X | 4mtrs / 4 ½ yards | 3mtrs/3 ½ yards |
| Size 7X | 4mtrs / 4 ½ yards | 3mtrs/3 ½ yards |
| Size 8X | 4.5mtrs / 5yards | 4mtrs /4 ½ yards |
| Size 9X | 4.5mtrs / 5yards | 4mtrs /4 ½ yards |
| Size 10X | 4.5mtrs / 5yards | 4mtrs /4 ½ yards |
| Size 11X | 4.5mtrs / 5yards | 4mtrs /4 ½ yards |
You will also need:
Iron on mid weight fusing/interfacing:
30cm of 90cm wide or 12 inches of1 yard wide interfacing.
Please note: Our interfacing allowance is calculated to for collar and collar stand only.
Please purchase extra interfacing if you intend to attach interfacing to the front bands of your make also.
You will need approximate 1 metre or 1 yard of interfacing fabric to interface the bands, collar & collar band.
Buttons Approximately 12
To view the video tutorial of this hack:
How to prepare pattern pieces:
To begin, we will create our new pattern pieces which are the ruffle/tier skirt sections.
We have calculated the skirt ruffle tier widths for each size in front & back sections.
Our calculations are based on 1 ½ x the width of the Ritual shirt lower edge.
| Size | Back Ruffle width Cm | Back Ruffle width Inches | Front Ruffle width Cm | Front Ruffle Width Inches | Height Ruffle length Cm | Height Ruffle length Inches |
| Size XS | 50.5cm | 20 | 47cm | 18 ½ | 30cm | 12 inches |
| Size Small | 52cm | 20 ½ | 49cm | 19 ¼ | 30cm | 12 inches |
| Size Medium | 54cm | 21 ¼ | 51 cm | 20 | 30cm | 12 inches |
| Size Large | 56cm | 22 | 53 cm | 21 | 30cm | 12 inches |
| Size 1X | 58cm | 23 | 55 cm | 21 ¾ | 30cm | 12 inches |
| Size 2X | 60cm | 23 ¾ | 57 cm | 22 ½ | 30cm | 12 inches |
| Size 3X | 62cm | 24 ½ | 59 cm | 23 ¼ | 30cm | 12 inches |
| Size 4X | 64cm | 25 ¼ | 60 cm | 23 ½ | 30cm | 12 inches |
| Size 5X | 65.5cm | 25 ¾ | 62cm | 24 ¼ | 30cm | 12 inches |
| Size 6X | 67.5cm | 26 ¾ | 64cm | 25 | 30cm | 12 inches |
| Size 7X | 69cm | 27 ¼ | 66cm | 26 | 30cm | 12 inches |
| Size 8X | 71cm | 28 | 68cm | 26 ¾ | 30cm | 12 inches |
| Size 9X | 73cm | 28 ¾ | 70cm | 27 ½ | 30cm | 12 inches |
| Size 10X | 74cm | 29 ¼ | 71.5 cm | 28 | 30cm | 12 inches |
| Size 11X | 75cm | 29 ½ | 73.5 cm | 28 ¾ | 30cm | 12 inches |
How to make ruffle pieces:
Back Skirt Ruffle/Tier
How to draw out the back ruffle skirt tier. The width is the amount included in the size chart above. The height is 30cm/12 inches for all sizes. Example – Back ruffle width Size 1X = width 58cm / 12 inches.
Find the back ruffle width of your size in the chart above. Rule a horizontal line across this amount.
Rule down vertically, a line on each end the width line of 30cm / 12 inches.
Draw another line to join the lower ends of the vertical lines to complete the rectangle.
Mark the Back ruffle skirt tier pattern piece as illustrated below. (Most sizes are cut on the fold)
Front Skirt Ruffle/Tier
Follow the same method as above, to draw the front skirt ruffle tier pattern piece. Refer to the size chart for the front ruffle width. Height is 30cm/12 inches all sizes. Complete rectangle.
Mark the front skirt ruffle as illustrated below. 
Belt Loops
The other new pattern piece is belt loops which are cut on the bias out the scrap fabrics. We will show you how to cut and sew these later in the tutorial.
Front Band Pattern Piece
Take the original front band paper pattern piece.
Now, find the cutting line of the shirt, from this line mark down 27cm or 11 inches.
Mark a line across, this will be the new cutting line for the Summer hack dress.
Cut away excess length of pattern piece below.

Sleeve Pattern Piece
How to create new line for Short Sleeves
Open your original Ritual pattern. The sleeve pattern includes an elbow line. We will use this line to create the short sleeve version.
On the sleeve pattern, use a marker / pencil to extend the elbow line out horizontally to the outer edges.
Now, Trace of the new pattern piece on your size line.

Fabric Layout
Original pieces from Ritual pattern
Front & Back section view B shirt, yoke, collar, collar stand & drawstring tie.
+ New & altered pieces
Front bands, sleeves & Ruffle /tier skirt front & back sections.
Cutting list
Front Cut x 2
Back Cut x 1 on the fold
Back yoke Cut x 1 on the fold
Sleeves Cut x 2
Collar Cut x 2 on the fold
Collar stand Cut x 2 on the fold
Front band Cut x 2
Back ruffle skirt tier Cut 1 on the fold most sizes (see notes below)
Front ruffle skirt tier Cut x 2
Draw string tie Cut x 2
(Draw string tie pattern piece can be shortened or lengthened to achieve the correct length for you.)
Interfacing/fusing
Collar Cut x 1 on the fold
Collar stand Cut x 1 on the fold
Ruffle Back Sections
Fabric width 115cm / 45 inches
Add seam allowance of 1.5 cm or 5/8 inch to the Centre back fold line on Ruffle back sections of sizes Size 1X to 11X to cut out on fabric width 115cm/ 45 inches wide.
Fabric width 140cm / 55 inches wide
Add seam allowance of 1.5 cm or 5/8 inch to the Centre back fold line on Ruffle back sections of sizes Size 8X to 11X to cut out on fabric width 115cm/ 45 inches wide.

It’s also important to refer to the original pattern for extra information on fabric layout & cutting notes.
Sewing Instructions:

Seam allowance 1.5cm / 5/8 inch as original pattern
Step 1 Back Yoke
Convert back box pleat into a gathered back section.
Take the back yoke and back sections. We now add new marks for our gathered back section.
Mark 10cm or 4 inches from each edge as shown.
Mark Centre marks also on yoke and back section.
Now, set your machine to a long stitch. Sew a gather stitch between the new marks on the top edge of the back section.
Draw in the gather stitch to match the new marks of the yoke and back section.

Step 2 Bodice Construction
Pin the yoke and back section together with the right sides facing. Match the marks including the Centre back marks. Take care to check the gathers are even. Stitch together. Finish raw edges & press the seam towards the yoke.
Right sides facing, stitch the front sections to the Back yoke and back section at the shoulder line and side seams.
Finish edges & press the seams towards the yoke.


Step 3 Ruffle/Tier Skirt Sections
Right sides facing, Pin & stitch the front ruffle sections to the back ruffle section as shown.
Set your machine to a long straight stitch and stitch a gather stitch across the entire top edge of the ruffle.
Sewing tip: stitch a 2nd gather stitch row close beside the first row.

Mark the center back of the top edge of the ruffle and the lower edge of the top section.
Now draw in the gather stitch of the ruffle to match the lower edge of the top section.
Match the centre back marks and the side seams. Pin & stitch the ruffle/tier to the top section. Finish raw edges.

Step 4 Front Bands & Collar

The bands & collar are sewn on to the summer hack version in the same method, as the original Ritual dress.
Follow the original Ritual dress/shirt pattern sewing instructions to stitch the bands and collar.
Bands – Step 1 original Ritual sewing instructions.
Collar – Step 4 original Ritual sewing instructions.
Now continue following instructions below in this tutorial.
Step 5 Sleeves
Mark up 2.5cm or 1 inch from the lower edges of the sleeves. Right sides together stitch the sleeves from the top to the marks at the lower edges.
Press the seam allowances open and finish raw edges. As shown. Fold the lower edges of the sleeves under by 2.5cm or 1 inch. Press the hems in position.
You will notice the lower edges of the hems have naturally spread out. Press the hems with this gap, the edges are folded from the inside seam, so there will be no raw edges showing.
Stitch hems in position sew across the gap as shown. The sleeve hems will naturally sit flat instead of rippling.
Stitch a long gather stitch between the notches.
Refer to the original Ritual sewing steps Step 12 Stitch sleeves to armhole to stitch the sleeves to the dress section.
Once you have sewn the sleeves to the armholes continue to follow the steps below.

Step 6 Drawstring Tie & Side Seam Belt Loops
Drawstring tie- follow the original sewing steps of the Ritual dress pattern to make the drawstring tie.
You will find the instructions at Step 8 Drawstring tie option original sewing instructions Ritual dress pattern.
Complete the drawstring tie from the original instructions and continue following the steps below to cut and sew the belt loops.
Belt loops
Take some of the left-over fabric and cut a bias strip. length approximately 20cm / 8inches by the width of 2.5cm or 1 inch wide.
Cut fabric strip on a diagonal / 45-degree angle as shown.

Step A: Fold & press the fabric wrong sides together to create a centre fold line.
Step B: Now open the fabric strip up with wrong side facing upwards
Step C: Fold & press the outer edges (right sides out) towards the centre fold line. Press the entire length of the bias strip.
Step D: Now bring the folded edges together to enclose the raw edges. Press & stitch the folded edges closed.

Belt loops placement
We recommend trying on the dress section to place your belt loops.
Or transfer the waist level mark from the printed pattern to the inside of the dress section at the side seam. Mark it with a pin.
Open out the dress section with the wrong side facing upwards.
Mark the first mark at the waist level, now make another mark 5cm or 2 inches above the first mark. Unpick the side seam in between the marks. Now take the sewn bias strip and cut two pieces to the length of 10cm or 4 inches
Make a loop by bring the ends together.

Thread the belt loop through the opening and pin it to one side of the seam allowance.
Stitch it to the seam allowance along the side seam stitch line.
Stitch the opening closed along the original side seam. Trim excess lengths of belt loops.

Step 7
Try on the Ritual summer dress hack to check length. Press raw edges under by 2.5cm or 1 inch. Finish raw edges and stitch the hem.
Refer to original sewing instructions of Ritual pattern Step 15 to sew the buttons & buttonholes.
That's the end of the hack tutorial! Be sure to watch the video tutorial here also.


